Kylin
查看版本
| nkvers
cat /etc/.productinfo
|
常见问题
| # yum 源报 ssl 证书错误
sslverify = 0
# 同步源
# 先将 yum repo 指向特定版本和架构的源,然后执行以下语句同步
reposync -n --norepopath --repoid=ks10-adv-updates --arch=x86_64 -p /opt/mirror/os/kylin/v10sp2/updates/x86_64
reposync -n --norepopath --repoid=ks10-adv-updates --arch=x86_64 -p /opt/mirror/os/kylin/v10sp1/updates/x86_64
reposync -n --norepopath --repoid=ks10-adv-updates --arch=aarch64 -p /opt/mirror/os/kylin/v10sp2/updates/aarch64
reposync -n --norepopath --repoid=ks10-adv-updates --arch=aarch64 -p /opt/mirror/os/kylin/v10sp1/updates/aarch64
reposync -n --norepopath --repoid=ks7-adv-updates --arch=x86_64 -p /opt/mirror/os/kylin/v7/updates/x86_64
reposync -n --norepopath --repoid=ks7-adv-updates --arch=aarch64 -p /opt/mirror/os/kylin/v7/updates/aarch64
reposync -n --norepopath --repoid=ks7-adv-updates --arch=x86_64 -p /opt/mirror/os/kylin/v7/updates/x86_64 --urls
|
配置网络
| # 配置 IP
[root@test ~]# cat /etc/sysconfig/network-scripts/ifcfg-ens33
TYPE=Ethernet
PROXY_METHOD=none
BROWSER_ONLY=no
#BOOTPROTO=dhcp
DEFROUTE=yes
IPV4_FAILURE_FATAL=no
IPV6INIT=yes
IPV6_AUTOCONF=yes
IPV6_DEFROUTE=yes
IPV6_FAILURE_FATAL=no
IPV6_ADDR_GEN_MODE=stable-privacy
NAME=ens33
UUID=c67c9f61-64d2-44ad-999a-80b9f260a775
DEVICE=ens33
#ONBOOT=no
ONBOOT=yes
BOOTPROTO=static
IPADDR=172.16.230.199
NETMASK=255.255.255.0
GATEWAY=172.16.230.2
DNS1=223.5.5.5
DNS2=114.114.114.114
# 重启网卡
ifdown ens33
ifup ens33
# nmcli 重新加载网卡配置文件
nmcli connection load /etc/sysconfig/network-scripts/ifcfg-ens33
nmcli connection up ens33
# 或者重新加载所有网卡配置文件
nmcli connection reload
nmcli connection up ens33
|
修改字符集
| # 查看当前字符集
locale
# 使用 localectl 命令修改
sudo localectl set-locale LANG=en_US.UTF-8
# 或者直接修改配置文件
[root@test ~]# vim /etc/locale.conf
LANG=en_US.UTF-8
|
修改时区
| # 查看所有可用时区
sudo timedatectl list-timezones
# 设置为东八区
sudo timedatectl set-timezone Asia/Shanghai
|
时间服务
| # 配置时间服务
$ sudo vim /etc/chrony.conf
server ntp.aliyun.com iburst
# 重启服务并设置为自启动
sudo systemctl restart chronyd
sudo systemctl enable chronyd
# 查看时间是否同步成功,IP 前面带 * 号表示同步成功
[root@test ~]# chronyc sources -v
210 Number of sources = 1
.-- Source mode '^' = server, '=' = peer, '#' = local clock.
/ .- Source state '*' = current synced, '+' = combined , '-' = not combined,
| / '?' = unreachable, 'x' = time may be in error, '~' = time too variable.
|| .- xxxx [ yyyy ] +/- zzzz
|| Reachability register (octal) -. | xxxx = adjusted offset,
|| Log2(Polling interval) --. | | yyyy = measured offset,
|| \ | | zzzz = estimated error.
|| | | \
MS Name/IP address Stratum Poll Reach LastRx Last sample
===============================================================================
^* 203.107.6.88 2 6 177 30 -2223us[-5612us] +/- 34ms
# 手工同步
chronyc makestep
|
单用户模式
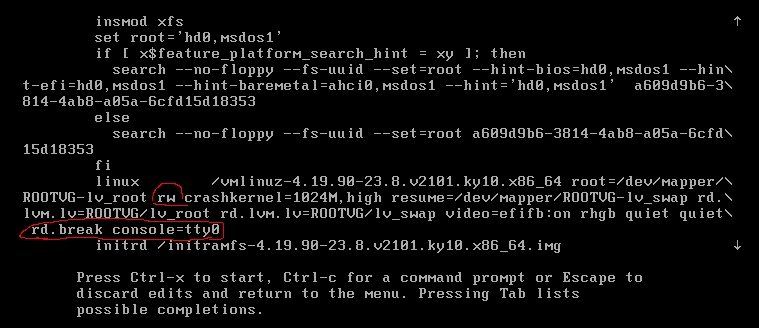
开机后,Grub 界面选择对应 Kernel,按 e 进入编辑模式
光标向下移动至 linux 开头的行,修改 ro 为 rw,末尾添加 rd.break console=tty0,按 Ctrl X 或 F10 保存继续

输入 chroot /sysroot 切换至主机系统

Links
作者: aisuhua